Holiday Treat Recipes for Orthodontic Braces
The Holidays are here which means family time, holiday activities, baking and eating holiday goodies commences. We have everything on your holiday to-do list right here! A fun and free family event and our 3 favorite holiday snacks that are braces friendly!
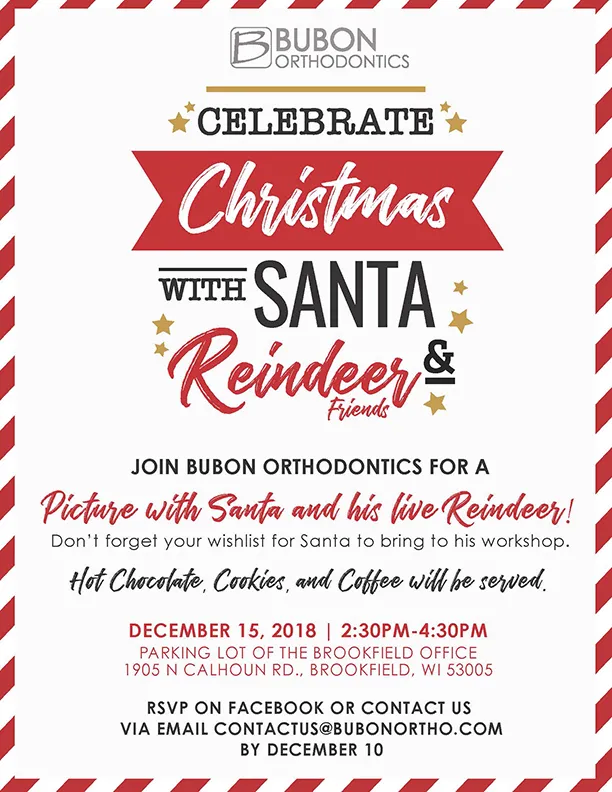
On December 15th Bubon Orthodontics will be hosting Santa, Mrs. Clause and their live reindeer at our Brookfield office! Come visit us and get your picture taken with Santa and his reindeer. Then you can complete your holiday wish list while enjoying some cookies and cocoa with family and friends! This is a complimentary event and will be from 2:30-4:30pm on Saturday, December 15th at 1905 N Calhoun Road, Brookfield, WI 53005 and will be fun for all ages!
Just in case you don’t get enough cookies while you’re there, we have our 3 favorite brace-friendly holiday treats that are fun to make for the whole family! Whether you’re making or tasting, remember there are some foods to stay away from if you have braces- anything hard, sticky or chewy. We understand it can be a challenge when you are surrounded by treats such as toffee and candy canes to resist the temptation. Here are our 3 favorite braces-friendly holiday goody recipes to make sure that you can indulge in some sweet treats yourself, or that your loved one with braces can enjoy!
Holiday Sugar Cookie Cutouts
Prep time 20 mins | Cook time 8 mins | Total time 3 hours
- 1 1/2 cups butter, softened
- 2 cups white sugar
- 4 eggs
- 1 tsp vanilla extract
- 5 cups all-purpose flour
- 2 tsp baking powder
- 1 tsp salt
- 1 cup powdered sugar
- 2 tsp milk
- 2 tsp light corn syrup
- ¼ tsp vanilla or almond extract
Instructions:
- In a large bowl, mix together softened butter and sugar until smooth. Beat in eggs and vanilla extract. Stir in the flour, baking powder, and salt. Cover, and chill dough for at least one hour (or overnight).
- Preheat oven to 400 degrees F, roll out dough on floured surface 1/4 to 1/2-inch-thick, if you need more flour you can add sugar to the flour to keep it sweet! Cut into shapes with any cookie cutter. Place cookies 1 inch apart on ungreased cookie sheets and place in the preheated oven.
- Bake 6 to 8 minutes and cool completely before decorating. This is a great time to make your frosting! (Remember, frosting the cookies while still hot/warm will melt the frosting.)
- In a small bowl, stir together the powdered sugar and milk until smooth. Beat in corn syrup and vanilla/almond extract until icing is smooth and glossy. If icing is too thick, add more corn syrup.
- Divide into separate bowls and add food colorings to each to desired intensity. You can dip the cookies or even paint them with a brush. Don’t forget to tag @BubonOrtho so we can see your culinary creations!
**Separate frosting into different bowls and add your favorite food coloring for extra decorating fun!**
Marshmallow Snowmen
Prep time 5 mins | Total time 15 mins
- Wooden skewers or toothpick skewers (depending on what size marshmallows you use)
- Marshmallows, either original size or jumbo
- White chocolate bark
- Milk or Dark chocolate bark
- Mini chocolate chips
- Assorted sprinkles
- Baking tray and parchment paper
Instructions:
- Place three marshmallows on your wooden skewers.
- Heat white chocolate bark either on stove or in microwave. If on the stove use low heat and continue to stir, if in the microwave heat for 30 seconds and stir and then 15 second increments and stir until melted and smooth.
- Take marshmallow skewers and dip into the chocolate and lay to dry on the parchment paper. While the chocolate is still wet, use the mini chocolate chips to place for eyes, mouth and buttons on the snowmen.
- To add variety, heat the milk/dark chocolate the same way as the white and use the white chocolate and drizzle designs on your snowmen. You can do this going back and forth between the white and milk/dark chocolate and decorate with your assorted sprinkles for extra fun! Allow to dry on your baking tray with parchment paper and either enjoy right away or wrap in shrink wrap for a sweet gift for a loved one! Don’t forget to tag #BubonOrtho so we can check out your cool designs!
Strawberry Santas
Prep time 3 mins | Total time 15 mins
- Strawberries
- Whipped cream
- Chocolate sprinkles
Instructions:
- Slice the bottom off the large end of a strawberry so that it stands upright and cut off the top quarter.
- Squirt some whipped cream onto the strawberry’s top flat surface and add two chocolate sprinkles to make the eyes of Santa’s face.
- Place the top quarter of the strawberry back onto the whipped cream to form Santa’s hat, and dab some cream on the very top of the strawberry to give his hat its white bobble.
We hope you enjoy making and tasting these fun holiday treats and hope to see you at Bubon Orthodontics office in Brookfield for some family holiday fun!